Monday, July 28, 2014

Sunday Funday

Today was SO productive.  We were listening to an inspirational speaker & a few things just hit home for me:

Everyone has two pains:  determination and regret.
Control the day or it will control you.
Pick something & do it!

So that's just what I did!  I've been dreaming of organizing my craft room for a while, so I finally convinced my hubby for us to go get the necessities & for him to hang me some shelves!


Still have some work for it all to come together, but this is so much more convenient that those plastic storage bins!

The first shelf:  I used old boxes (gold fish & cheese itz) & spray painted them to store all of my paint.  A left over mason jar from my wedding for the paint brushes, & all of my paint pens, markers, pens, etc in the storage container.   Lastly, my ribbon "rod"!  I didn't have a suspension rod on hand so I just used some twine!  Love this pinterest inspired idea!
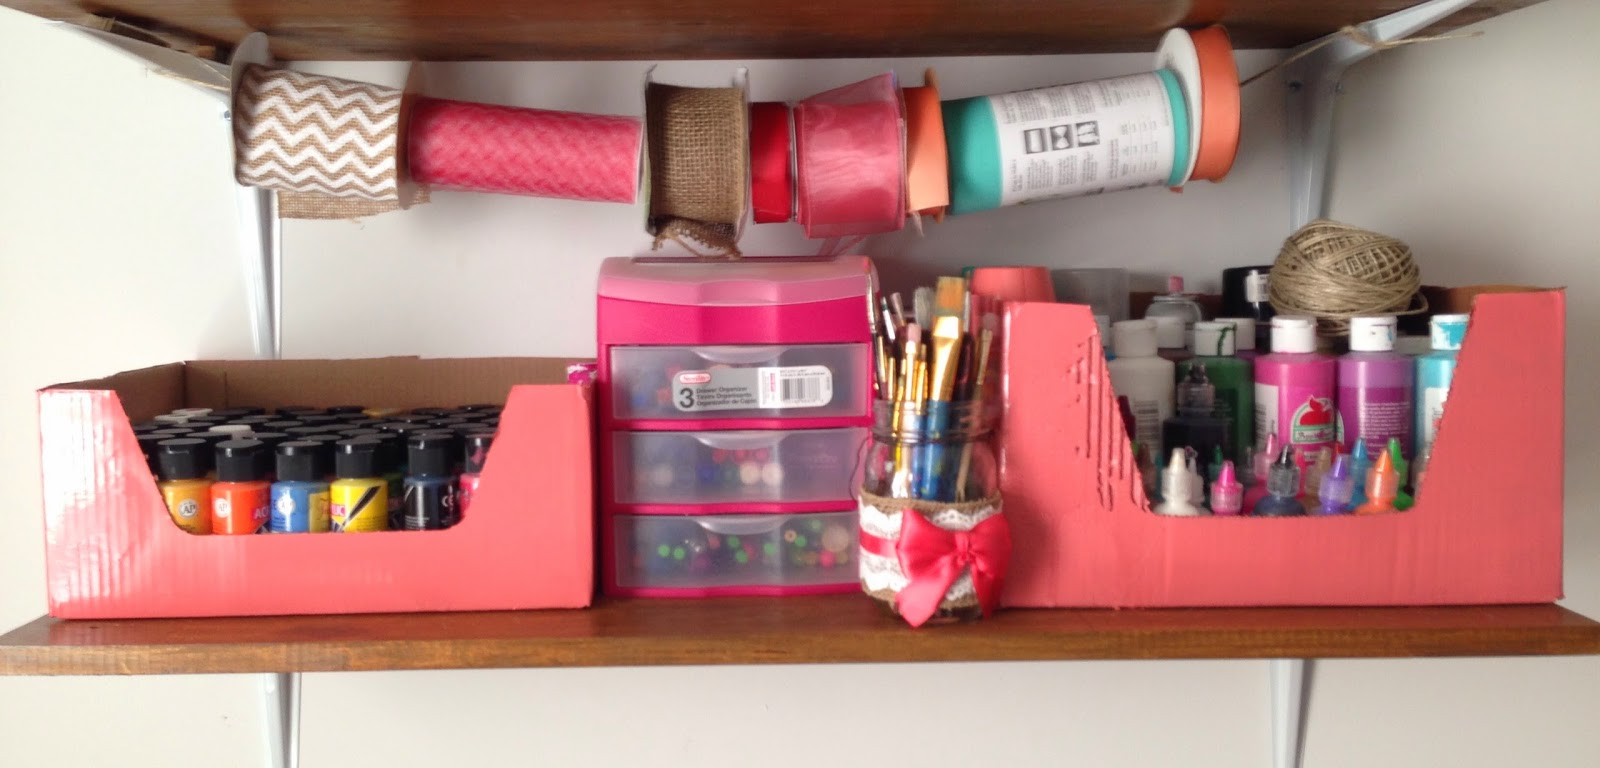
The second shelf:  Another two old boxes spray painted to hold all paper products, the scrap book box I already had, & some randoms (wood glue, hot glue gun, hole puncher) that I need to try & find/make a container for!

 The third shelf:  literally the random things. Wood stain, tap, sealant, paint tray, vase full of ribbon, tiles, vinyl letters, extra material, this list goes on!  I want to try & make this a little "prettier"  also,  but for now it works!


My next goal is to make a crafting table.  I saw a great idea, where two shelves & a piece of wood were used and ta-da! A great use of space is made--storage PLUS craft table.


On a side note, since I had the hubby at work I had to take FULL advantage of this!  I made a wine rack out of a pallet probably about 6 months ago & it had just been sitting around because we didn't have anything to hang it with.  But today we finally did!  


I love this piece.  It's just a piece of a pallet that I stained.  The wine rack part was a little bit more difficult, but obviously do able!  I made the "t" pieces with wood glue, but it was so frustrating trying to glue those pieces to the pallet!  First I did them too close together so a glass wouldn't fit.  Once I got the spacing right, it was a matter of getting them all on there (without moving) & putting enough weight on it so they would be secure.  All this without being able to use clams & with a curious kitten nosing her way around haha BUT I'm so happy with the results!  I'm thinking about painting something on the front, but haven't decided yet.

Anyway, I'm off to continue organizing my craft room :) happy crafting!

Tuesday, July 22, 2014

Bridal Shower Fun!

Sooo I have 4 weddings in my near future--two of which I'm MOH (October 2014 & June 2015), one I'm a bridesmaid (April 2015), & one I am solely a guest (September 2014-however she will be my sister in law so of course I'm still obligated to help).  Needless to say there are a LOT of bridal shenanigans to plan & partake in, around all of the baby showers also in my life, of course.  Guess I'm just at that point in my life -- weddings & babies everywhere! :)

Saturday I got to knock the first event off of the list--Shannon's Bridal Shower!  Now, this was my first bridal shower that I've attended AND the first I've had the pleasure of planning.  Nothing like killing two birds with one stone, right?!

Luckily, I had the assistance of one of her family friends who helped take care of the food & location.  We had all sorts of yummy finger foods & desserts -- including a chocolate fountain & (spiked) punch, of course!  (Disclaimer--sorry for the HORRIBLE picture quality of all of these)

We played the "purse game"--certain things you would find in your purse are worth points, guest with the most points wins & the "him or her" game--a list of 10 statements, guests have to guess whether they were made and/or relate to the bride or the groom, guest with the most correct wins!.   

We bought a platter for guests to sign as the guest book.  Once you bake it at 350 for about 30 minutes, it is officially multi-purposeful! I also had a Date Night Jar & Advice bucket with cards that had "Good Marriage Advice" on one side & "Honest Marriage Advice" on the other.  How cute is that?!  We got to hear some very funny, & great, advice from women who have years of experience!! 


Of course I had to craft in honor of the celebration:  an adorable "__ days until she's hitched" sign &  a "future mrs warren" banner.   Both so easy.  

I think the sign is my favorite.  I knew since I had so many bridal related events soon, I should make it multi-purposeful so I could use it for all of them!  I just took an extra canvas I had laying around, used painters tape to have even lines, & used a sharpie for the writing.  I cut a heart out of cardstock, spray painted it with chalkboard paint, hot glued it on & voila! 

I'm sure you've seen the banners all over Etsy.  Now, though they're not priced too highly, you're still wasting your money!  I literally made that out of twine, sandpaper, & paint--all extremely inexpensive items!  I must say, using the sandpaper was probably one of my best ideas yet (if i do say so myself hehe)!  They're like a dollar for a pack of 30, they're pre cut rectangles, & they have the, very in right now, rustic feel.  Definitely can't go wrong there!


Feel free to leave any questions or comments & happy crafting!! :) 


Tuesday, June 10, 2014

DIY Wedding on a Budget

Well, we did it!  I'm finally Mrs. Michael Yerry! How exciting!  


Overall, the wedding went excellent! We had a small, intimate ceremony with family & close friends in attendance. A few hiccups, but nothing that couldn't damper the mood.  Even the photographers said they were impressed by the quaintness :)  All of the DIY things ended up fitting together very nicely. I'm going to attempt to break it all down!

Granted, I am an extreme craftaholic, so I already had a lot of items on hand.   I also suggest using your resources:  one of my associates gave me left over tea lights from her wedding, my best friend brought sand from home (Outer Banks) & some mason jars,  a sorority sister brought her (fancy) camera & a cupcake stand, & mom brought some food.  You will be surprised how many people will be willing to help you for your special day!

Disclosure -- my in-laws helped tremendously, so my figures may be slightly skewed.  They rented a cabin for us to stay in, they rented chairs for the ceremony & they got our cake/cupcakes.  I'm not sure the cost of these things.  We also borrowed many things, which I HIGHLY recommend!  Especially if you have friends who've recently been married.  Take all the help you can get!

Our wedding was in my in-laws backyard--they have a beautiful cabin right on Lake James,  we couldn't have asked for a more beautiful location & free doesn't hurt one bit!!

Okay let's see...
Pictures:  3 hours w/ 2 photographers & an assistant; 150 digital images -- $880.69 after tax, then iPhones & friend's cameras for the remanding of the time--free!  I used CapsuleCam (free app!)  so I could have all candid photos in one place--it was great.   My sister also video'd the ceremony, toasts, etc. on a iPhone.

Food/Drinks:  hot dogs, hamburgers (plus buns), condiments, s'mores, 4 cases of beer, 3 boxes of wine $160 (this includes sparklers, yay for a sparkler sendoff!);  his parents had tea/water & bought a variety pack of chips & my mom brought BBQ.

Music:  iPod + iHome = done!   A friend helped start/stop processional music. $0!

Decorations:  We used white christmas lights & a lot of nicknacks we had among the families to do most of the decorating.  We got a lot of ribbon, burlap, lace, tulle, tiki torches, etc. from various craft stores (Michael's, A.C. Moore, Hobby Lobby)  probably a total of $100, however I have a plethora of items left over.  I probably only needed half of what I got!  Below are a few crafts I made: 

Guest book -- wooden letter "Y" spray painted coral with a white paint pen for signing

Ring for a Kiss Bell ($8 cow bell from tractor supply)  on a shepherd's hook held by twine.  I was border line regretting making this as often as it rang back to back haha


I also made a cooler & cornhole boards for the ceremony, but of course those will have prolonged use.


We bought the cornhole boards built plain with bags for $135,  I paid about $50 for the paint & sealant I used, but I have plenty left over of that as well.   The cooler is from Walmart & used paint & sealant I already had on hand! They were a great touch to the ceremony & will last throughout our marriage!

The little Pinterest inspired crafts definitely helped tie everything together perfectly!  

It's hard to give you a 100% accurate price point of our wedding due to using many things we already had & the assistance we received buuut with rounding up/inflation we spent (approximately) $1500.00. 

Granted, I didn't include my dress (about $700 after alterations),  hair & make up ($70), nails ($131 for 2 mani/pedis + a mani)  & our rings (total of about $3500).   So really we spent about $5900 in total, however these last few things, along with the photographer, were splurges we agreed were "must haves"--there was no way I was giving up lifetime memories captured in film!

**We are planning on going on our honeymoon on our 1 year anniversary, which will give us the time to save until then!  Haven't quite decided where were going yet, but still so excited!**

All in all, I am so pleased with our intimate wedding & proud of how everything came together so beautifully, but I do have to admit that the below picture is the exact emotion I was feeling up until I was walking down the aisle.  It was very stressful, but beyond worth it!


Happy crafting!!

Wednesday, May 7, 2014

Wedding time...?

We got some amazing news last week that could change our life! (yay!) howeverrrr it could also change our wedding date! 😳   What's even harder, is we won't know for sure until potentially only 4 days before hand!! Woah! Luckily we're doing so small & haven't sent anything in writing or invited a ton of people or anything. But in all reality it's opportunities like this that really put life into perspective. That remind you that as much as you may, or may not, plan; the decision is ultimately not up to you.

Soooo, even though we're, oddly enough, hoping for our wedding to be called off , we still have to prepare for the chance that it will not be.

Saturday I went to Charlotte with my future MIL to do some last minute shopping. We got about every coral ribbon that AC Moore, Hobby Lobby, & Michael's offered.  It's hard envisioning things since we're doing so laid back & care free, but I guess that's part of the enjoyment of all of it.

Yesterday's project was mason jars, with no specific usage. Maybe vases, maybe lanterns, maybe even glasses! Who knows!   Regardless they did turn out adorable, if I do say so myself!!


They were seriously too easy (& inexpensive)!  Mason jars from Goodwill, burlap, lace, & coral ribbon from the craft store of your choice, & hot glue!  Made the bows using the "fork trick", but used a masher instead so they were bigger!

Happy Crafting! 

Saturday, April 5, 2014

William Levi

Levi was born at 3:55pm April 2, 2014.   I know he's not biologically my nephew, but then again, he definitely is!  His mama is one of my very best friends & being there through this pregnancy for her, from day one, has been one of the best experiences of my life!!  He is literally the most handsome baby ever!! I also had the pleasure of finishing his "Welcome Wreath"!  I loved that she trusted me with the responsibility to complete this!!  I'm one happy Auntie!


Yerry Wedding!

The fact that I will be married soon is definitely setting in!! Yesterday we got our marriage license, I bought my dress AND picked up his ring!! Too excited. I started making our wedding signs today & I love them! Still need some touch ups, but so excited for my vision to be coming together!